Pose Guided Person Image Generation
Pose Guided Person Image Generation
Liqian Ma, Xu Jia2, Qianru Sun, Bernt Schiele, Tinne Tuytelaars, Luc Van Gool
28 Jan 2018
Abstract
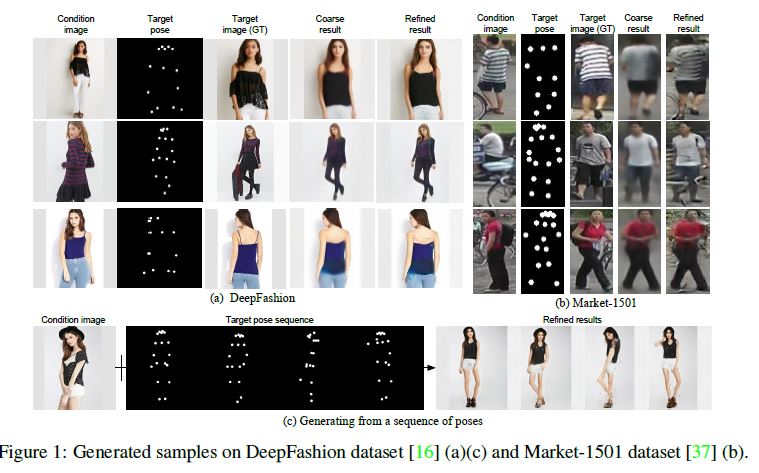
This paper proposes the novel Pose Guided Person Generation Network (PG2) that allows to synthesize person images in arbitrary poses, based on an image of that person and a novel pose.
본 논문은 그 사람의 이미지와 새로운 포즈를 기반으로 임의의 포즈로 사람 이미지를 합성할 수 있는 새로운 PG2 (Pose Guided Person Generation Network)를 제안한다.
Our generation framework PG2 utilizes the pose information explicitly and consists of two key stages: pose integration and image refinement.
우리의 generation framework PG2는 포즈 정보를 명시적으로 활용하고 pose integration과 image refinement의 두 가지 주요 단계로 구성된다.
In the first stage the condition image and the target pose are fed into a U-Net-like network to generate an initial but coarse image of the person with the target pose.
첫 번째 단계에서 condition image와 target pose는 U-Net과 유사한 네트워크로 공급되어 target pose를 가진 사람의 coarse(조잡한) image이지만 초기 이미지를 생성한다.
The second stage then refines the initial and blurry result by training a U-Net-like generator in an adversarial way. Extensive experimental results on both 128x64 re-identification images and 256x256 fashion photos show that our model generates high-quality person images with convincing details.
그런 다음 두 번째 단계는 U-Net 같은 generator를 적대적 방법(adversarial way)으로 훈련하여 초기 결과와 흐릿한 결과를 개선한다.
128x64 재식별 이미지와 256x256 패션 사진에 대한 광범위한 실험 결과는 우리 모델이 설득력 있는 디테일로 고품질 사람 이미지를 생성한다는 것을 보여준다.
1 Introduction
Generating realistic-looking images is of great value for many applications such as face editing, movie making and image retrieval based on synthesized images. Consequently, a wide range of methods have been proposed including Variational Autoencoders (VAE) [14], Generative Adversarial Networks (GANs) [6] and Autoregressive models (e.g., PixelRNN [30]). Recently, GAN models have been particularly popular due to their principle ability to generate sharp images through adversarial training. For example in [21, 5, 1], GANs are leveraged to generate faces and natural scene images and several methods are proposed to stabilize the training process and to improve the quality of generation.
사실적으로 보이는 이미지를 생성하는 것은 합성된 이미지를 기반으로 얼굴 편집, 영화 제작, 이미지 검색과 같은 많은 애플리케이션에 매우 중요하다. 결과적으로 Variational Autoencoders (VAE)[14], GAN(Generative Adversarial Network)[6] 및 Autoregressive models (e.g., PixelRNN [30])을 포함한 광범위한 방법이 제안되었다. 최근 GAN 모델은 적대적 훈련을 통해 sharp images를 생성하는 principle ability으로 인해 특히 인기를 끌고 있다. 예를 들어 [21, 5, 1]에서 GAN을 활용하여 얼굴 및 자연 장면 이미지를 생성하고 훈련 프로세스를 안정화하고 생성 품질을 개선하기 위해 몇 가지 방법을 제안한다.
From an application perspective, users typically have a particular intention in mind such as changing the background, an object’s category, its color or viewpoint.
응용 프로그램의 관점에서, 사용자는 일반적으로 배경, 객체 범주, 색상 또는 viewpoint 변경과 같은 특정한 의도를 염두에 둔다.
우리의 접근 방식의 핵심 아이디어는 generation process를 직접 제어할 수 있도록 해당 의도를 적절히 표현하여 명시적으로 생성 프로세스를 안내하는 것이다. 보다 구체적으로, 우리는 기준 이미지와 지정된 포즈 모두를 조건화하여 이미지를 생성할 것을 제안한다.
With a reference image as condition, the model has sufficient information about the appearance of the desired object in advance.
The guidance given by the intended pose is both explicit and flexible. So in principle this approach can manipulate any object to an arbitrary pose.
In this work, we focus on transferring a person from a given pose to an intended pose.
There are many interesting applications derived from this task. For example, in movie making, we can directly manipulate a character’s human body to a desired pose or, for human pose estimation, we can generate training data for rare but important poses.
reference image를 조건으로 하여, 모델은 원하는 객체의 모양에 대한 충분한 정보를 사전에 갖는다. 의도된 pose에 의해 제공되는 guidance는 명확하고 유연하다. 원칙적으로 이 접근 방식은 임의의 pose로 어떤 객체도 조작할 수 있다. 이 작업에서, 우리는 주어진 자세에서 의도된 pose로 사람을 옮기는 데 초점을 맞춘다. 이 작업에서 파생된 많은 흥미로운 응용 프로그램이 있다. 예를 들어, 영화 제작에서 우리는 캐릭터의 인체를 원하는 포즈로 직접 조작하거나, human pose estimation을 위해 드물지만 중요한 포즈에 대한 훈련 데이터를 생성할 수 있다.
Transferring a person from one pose to another is a challenging task.
A few examples can be seen in Figure 1.
It is difficult for a complete end-to-end framework to do this because it has to generate both correct poses and detailed appearance simultaneously.
Therefore, we adopt a divide-and conquer strategy, dividing the problem into two stages which focus on learning global human body structure and appearance details respectively similar to [35, 9, 3, 19].
한 자세에서 다른 자세로 사람을 옮기는 것은 어려운 일이다.
몇 가지 예는 Figure 1에서 볼 수 있다. correct poses와 detailed appearance을 동시에 생성해야 하기 때문에 완전한 end-to-end framework가 이를 수행하기는 어렵다. 따라서, 우리는 문제를 [35, 9, 3, 19]와 유사한 global human body structure와 appearance details을 학습하는 데 중점을 둔 두 단계로 나누는 divide-and conquer strategy을 채택한다.
At stage-I, we explore different ways to model pose information.
A variant of U-Net is employed to integrate the target pose with the person image.
It outputs a coarse generation result that captures the global structure of the human body in the target image.
A masked L1 loss is proposed to suppress the influence of background change between condition image and target image. However, it would generate blurry result due to the use of L1.
I 단계에서, 우리는 포즈 정보를 모델링하는 다양한 방법을 탐구한다.
target pose와 person image를 통합하기 위해 변형된 U-Net이 사용된다. target image에서 global structure of the human body를 캡처하는 coarse generation result를 출력한다. condition image과 target image 사이의 배경 변화의 영향을 억제하기 위해 masked L1 loss가 제안된다. 그러나 L1의 사용으로 인해 blurry result가 발생할 수 있다.
At stage-II, a variant of Deep Convolutional GAN (DCGAN) model is used to further refine the initial generation result.
The model learns to fill in more appearance details via adversarial training and generates sharper images.
Different from the common use of GANs which directly learns to generate an image from scratch, in this work we train a GAN to generate a difference map between the initial generation result and the target person image. The training converges faster since it is an easier task.
단계 II에서, 초기 생성 결과를 더욱 세분화하기 위해 Deep Convolutional GAN(DCGAN) 모델의 변형이 사용된다. 이 모델은 적대적 훈련을 통해 더 많은 appearance details을 채우는 방법을 배우고 더 선명한 이미지를 생성한다.
처음부터 이미지 생성을 직접 학습하는 GAN의 일반적인 사용과는 달리, 본 연구에서는 초기 생성 결과와 target person image 간에 차이 맵을 생성하도록 GAN을 훈련시킨다. 이 훈련이 더 쉬운 일이기 때문에 더 빨리 수렴된다.
Besides, we add a masked L1 loss to regularize the training of the generator such that it will not generate an image with many artifacts.
Experiments on two dataset, a low-resolution person re-identification dataset and a high-resolution fashion photo dataset, demonstrate the effectiveness of the proposed method.
또한 많은 artifacts로 이미지를 생성하지 않도록 generator의 training을 정규화하기 위해 masked L1 loss를 추가한다. 저해상도 인물 재식별 데이터 세트와 고해상도 패션 사진 데이터 세트라는 두 가지 데이터 세트에 대한 실험은 제안된 방법의 효과를 입증한다.
Our contribution is three-fold.
i) We propose a novel task of conditioning image generation on a reference image and an intended pose, whose purpose is to manipulate a person in an image to an arbitrary pose.
ii) Several ways are explored to integrate pose information with a person image. A novel mask loss is proposed to encourage the model to focus on transferring the human body appearance instead of background information.
iii) To address the challenging task of pose transfer, we divide the problem into two stages, with the stage-I focusing on global structure of the human body and the stage-II on filling in appearance details based on the first stage result.
i) 우리는 reference image와 의도된 포즈에서 이미지 생성을 조절하는 새로운 작업을 제안한다. 이 작업은 사람 이미지를 arbitrary pose로 조작하는 것이다.
ii) pose information을 사람 이미지와 통합하기 위한 여러 가지 방법을 탐구한다. 모델이 background information 대신 human body appearance을 전달하는 데 초점을 맞추도록 하기 위해 novel mask loss가 제안된다.
iii) pose transfer이라는 어려운 과제를 해결하기 위해,
global structure of the human body에 집중하는 단계 I 그리고 1단계 결과에 기반한 appearance details을 채우는 단계 II와 함께 문제를 두 단계로 나눈다.
2 Related works
Recently there have been a lot of works on generative image modeling with deep learning techniques.
These works fall into two categories.
최근에는 딥 러닝 기술을 사용한 생성 이미지 모델링에 대한 연구가 많이 이루어지고 있다. 이 작업들은 두 가지 범주로 나뉜다.
1
The first line of works follow an unsupervised setting.
작업들의 첫 번째 라인은 unsupervised setting을 따른다.
One popular method under this setting is variational autoencoders proposed by Kingma and Welling [14] and Rezende et al. [25], which apply a re-parameterization trick to maximize the lower bound of the data likelihood.
이 설정에서 인기 있는 한 가지 방법은 Kingma와 Welling[14] 및 Rezende 등이 제안한 variational autoencoders이다. [25] - data likelihood의 lower bound를 최대화하기 위해 re-parameterization trick을 적용한다.
Another branch of methods are autogressive models [28, 30, 29] which compute the product of conditional distributions of pixels in a pixel-by-pixel manner as the joint distribution of pixels in an image.
또 다른 방법의 branch는 autogressive models[28, 30, 29]로, 픽셀 단위로 ‘픽셀의 conditional distributions(조건부 분포)의 곱’을 ‘이미지의 픽셀의 joint distribution(결합 분포)’로 계산한다.
The most popular methods are generative adversarial networks (GAN) [6], which simultaneously learn a generator to generate samples and a discriminator to discriminate generated samples from real ones.
가장 널리 사용되는 방법은 generative adversarial networks (GAN)[6]로, 샘플을 생성하기 위한 generator와 생성된 샘플을 실제와 구별하기 위한 discriminator를 동시에 학습한다.
Many works show that GANs can generate sharp images because of using the adversarial loss instead of L1 loss.
In this work, we also use the adversarial loss in our framework in order to generate high-frequency details in images.
많은 연구는 GAN이 L1 loss 대신 adversarial loss을 사용하기 때문에 sharp images를 생성할 수 있음을 보여준다. 본 연구에서는 이미지에서 high-frequency details를 생성하기 위해 프레임워크의 adversarial loss를 사용한다.
2
The second group of works generate images conditioned on either category or attribute labels, texts or images.
두 번째 작업 그룹은 범주 또는 속성 레이블, 텍스트 또는 이미지에 따라 조건화된 이미지를 생성한다.
Yan et al. [32] proposed a Conditional Variational Autoencoder (CVAE) to achieve attribute conditioned image generation.
Yan등은 [32] 특성 조건화 이미지 생성을 달성하기 위해 Conditional Variational Autoencoder (CVAE)를 제안하였다.
Mirza and Osindero [18] proposed to condition both generator and discriminator of GAN on side information to perform category conditioned image generation.
Mirza와 Osindero[18]는 범주 조건화 이미지 생성을 수행하기 위해 GAN의 generator와 discriminator를 side information에 조건화하는 것을 제안했다
Lassner et al. [15] generated full-body people in clothing, by conditioning on the fine-grained body part segments.
Lassner등은 [15] 세분화된 신체 부위(fine-grained body part) segments를 조절하여 옷을 입은 전신 사람을 생성했다.
Reed et al. proposed to generate bird image conditioned on text descriptions by adding textual information to both generator and discriminator [24] and further explored the use of additional location, keypoints or segmentation information to generate images [22, 23].
Reed 등은 generator와 discriminator에 textual information를 추가하여 text 설명이 조건화된 bird image를 생성하는 것을 제안했고 [24] 이미지를 생성하기 위해 추가 위치, keypoints 또는 segmentation 정보의 사용을 추가로 탐구했다[22, 23].
With only these visual cues as condition and in contrast to our explicit condition on the intended pose, the control exerted over the image generation process is still abstract.
Several works further conditioned image generation not only on labels and texts but also on images.
이러한 시각적 단서만 조건이고 의도된 포즈에 대한 우리의 명시적 조건과 대조적으로, 이미지 생성 프로세스에 대해 발휘되는 제어는 여전히 추상적이다. 여러 작업은 레이블과 텍스트뿐만 아니라 이미지에서도 조건화된 이미지 생성을 추가로 수행한다.
Researchers [34, 33, 11, 8] addressed the task of face image generation conditioned on a reference image and a specific face viewpoint.
연구자들은 [34, 33, 11, 8] reference image와 specific face viewpoint에 따라 조건화된 얼굴 이미지 생성 과제를 다루었다.
Chen et al. [4] tackled the unseen view inference as a tensor completion problem, and use latent factors to impute the pose in unseen views.
첸 등은 [4] unseen view inference을 tensor completion problem로 다루었고, latent factors을 사용하여 unseen views에서 pose를 귀속시킨다.
Zhao et al. [36] explored generating multi-view cloth images from only a single view input, which is most similar to our task.
Zhao 등은 [36] single view input에서만 multi-view cloth images를 생성하는 방법을 탐구했는데, 이는 우리의 작업과 가장 유사하다.
However, a wide range of poses is consistent with any given viewpoint making the conditioning less expressive than in our work.
그러나, 광범위한 포즈는 주어진 관점과 일관되어 조건화가 우리의 작업보다 덜 표현적이다.
In this work, we make use of pose information in a more explicit and flexible way, that is, using poses in the format of keypoints to model diverse human body appearance.
본 연구에서, 우리는 pose information를 보다 명확하고 유연한 방법으로, 즉 다양한 human body appearance을 모델링하기 위해 키포인트 형식의 포즈를 사용한다.
It should be noted that instead of doing expensive pose annotation, we use a state-of-the-art pose estimation approach to obtain the desired human body keypoints.
expensive pose annotation을 수행하는 대신, 원하는 인체 키 포인트를 얻기 위해 최신 pose estimation 접근법을 사용한다는 점에 유의해야 한다.
3 Method
Our task is to simultaneously transfer the appearance of a person from a given pose to a desired pose and keep important appearance details of the identity.
우리의 임무는 주어진 포즈에서 원하는 포즈로 사람의 외모를 동시에 이전하고 신원의 중요한 appearance details을 유지하는 것이다.
As it is challenging to implement this as an end to-end model, we propose a two-stage approach to address this task, with each stage focusing on one aspect.
이것을 end to-end model로 구현하는 것이 어렵기 때문에, 우리는 각 단계가 한 가지 측면에 중점을 두고 이 과제를 해결하기 위한 2단계 접근법을 제안한다.
For the first stage we propose and analyze several model variants and
for the second stage we use a variant of a conditional DCGAN to fill in more appearance details.
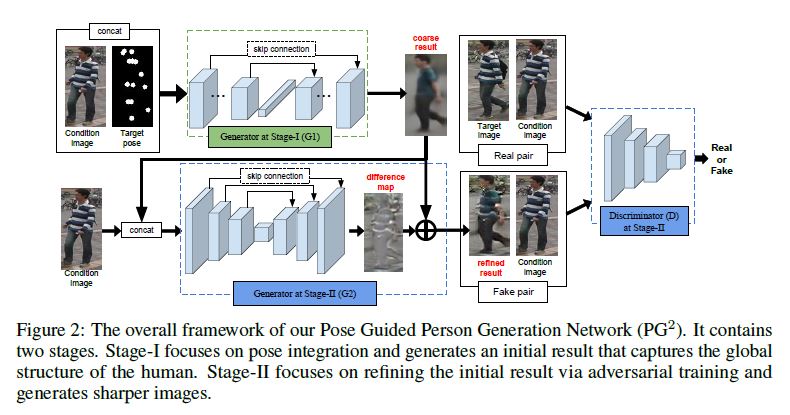
The overall framework of the proposed Pose Guided Person Generation Network (PG2) is shown in Figure 2.
첫 번째 단계에서는 여러 모델 변형을 제안하고 분석하고
두 번째 단계에서는 conditional DCGAN의 변형을 사용하여 더 많은 appearance details를 채운다. 제안된 Pose Guided Person Generation Network (PG2)의 전체적인 프레임워크는 Figure 2에 나와 있다.
3.1 Stage-I: Pose integration
At stage-I, we integrate a conditioning person image IA with a target pose PB to generate a coarse result \(\hat{I}_B\) that captures the global structure of the human body in the target image \(I_B\).
I 단계에서, 우리는 conditioning person image IA 와 target pose PB 를 통합한다; target image \(I_B\)에서 global structure of the human body를 캡처하는 coarse result \(\hat{I}_B\)를 생성하기 위해서
Pose embedding. To avoid expensive annotation of poses, we apply a state-of-the-art pose estimator [2] to obtain approximate human body poses. The pose estimator generates the coordinates of 18 keypoints.
Using those directly as input to our model would require the model to learn to map each keypoint to a position on the human body.
Pose embedding. expensive annotation of poses을 피하기 위해 최신 pose estimator[2]를 적용하여 대략적인 human body poses를 얻는다.
pose estimator는 18개의 keypoints의 좌표를 생성한다.
이러한 정보를 모델에 직접 입력으로 사용하려면 모델이 각 keypoint를 인체의 위치에 매핑하는 방법을 학습해야 한다.
Therefore, we encode pose \(P_B\) as 18 heatmaps.
Each heatmap is filled with 1 in a radius of 4 pixels around the corresponding keypoints and 0 elsewhere (see Figure 3, target pose).
We concatenate \(I_A\) and \(P_B\) as input to our model. In this way, we can directly use convolutional layers to integrate the two kinds of information.
따라서, 우리는 포즈 \(P_B\)를 18개의 heatmap으로 인코딩한다. 각 heatmap은 해당 keypoints 주변의 반경 4픽셀은 1로 채워지고 다른 곳에서는 0으로 채워진다(Figure 3, target pose 참조).
우리는 \(I_A\)와 \(P_B\)를 모델에 입력으로 연결한다. 이러한 방식으로, 우리는 두 종류의 정보를 통합하기 위해 직접 convolutional layers를 사용할 수 있다.
Generator G1. As generator at stage I, we adopt a U-Net-like architecture [20], i.e., convolutional autoencoder with skip connections as is shown in Figure 2.
Specifically, we first use several stacked convolutional layers to integrate \(I_A\) and \(P_B\) from small local neighborhoods to larger ones so that appearance information can be integrated and transferred to neighboring body parts.
Generator G1. 1단계에서 generator로 우리는 U-Net과 유사한 architecture[20], 즉 Figure 2와 같이 skip connections이 있는 convolutional autoencoder를 채택한다.
구체적으로, 우리는 먼저 appearance information이 통합되고 neighboring body parts로 이동될수 있게 하기 위해서 small local neighborhoods에서 larger local neighborhoods까지 \(I_A\) 와 \(P_B\)가 통합시키기 위해서 몇몇개로 쌓인 convolutional layers를 사용한다.
Then, a fully connected layer is used such that information between distant body parts can also exchange information.
After that, the decoder is composed of a set of stacked convolutional layers which are symmetric to the encoder to generate an image.
그런 다음, 정보를 교환할 수 있는 distant body parts 사이의 정보와 같은 곳에 fully connected layer가 사용된다. 그런 후에, 디코더는 인코더에 이미지를 생성하는 데 대칭이 쌓여 나선형의. 층들의 세트로 구성됩니다.
The result of the first stage is denoted as \(\hat{I}\)B1.
In the U-Net, skip connections between encoder and decoder help propagate image information directly from input to output.
In addition, we find that using residual blocks as basic component improves the generation performance.
In particular we propose to simplify the original residual block [7] and have only two consecutive conv-relu inside a residual block.
첫 번째 단계의 결과는 \(\hat{I}\)B1로 표시된다.
U-Net에서 encoder와 decoder 간의 skip connections은 이미지 정보를 입력에서 출력으로 직접 전파하는 데 도움이 된다. 또한, 우리는 residual blocks을 basic component로 사용하는 것이 generation performance을 향상시킨다는 것을 발견했다. 특히 original residual block[7]을 단순화하고 residual block 내부에 2개의 consecutive conv-relu만 가질 것을 제안한다.
Pose mask loss. To compare the generation \(\hat{I}\)B1 with the target image \(I_B\), we adopt L1 distance as the generation loss of stage-I.
Pose mask loss. generation \(\hat{I}\)B1와 target image \(I_B\)를 비교하기 위해, 우리는 1단계의 generation loss로서 L1 distance를 채택하였다.
However, since we only have a condition image and a target pose as input, it is difficult for the model to generate what the background would look like if the target image has a different background from the condition image.
그러나, 우리는 입력으로 condition image와 target pose만 가지고 있기 때문에, 모델이 target image가 condition image와 다른 배경을 가진 경우 배경처럼 보이는 것을 생성하는 것은 어렵다.
Thus, in order to alleviate the influence of background changes, we add another term that adds a pose mask $M_B$ to the L1 loss such that the human body is given more weight than the background.
따라서 배경 변화의 영향을 완화하기 위해, L1 loss에 pose mask \(M_B\)를 추가하여 human body에 배경보다 더 많은 weight가 주어지도록 하는 또하나의 term를 추가한다.
The formulation of pose mask loss is given in Eq. 1 with \(\odot\) denoting the pixels-wise multiplication: \[L_{G1}=||(G1(I_A,P_B) - I_B) \odot (1+M_B)||_1, \qquad \qquad \qquad \qquad \qquad \qquad \qquad \qquad \qquad \qquad (1)\]

The pose mask \(M_B\) is set to 1 for foreground and 0 for background and is computed by connecting human body parts and applying a set of morphological operations such that it is able to approximately cover the whole human body in the target image, see the example in Figure 3.
The output of \(G_1\) is blurry because the L1 loss encourages the result to be an average of all possible cases [10].
pose mask \(M_B\)는 foreground의 경우는 1로, background의 경우 0으로 설정되며, human body parts을 연결하고 target image에서 전체 human body를 대략적으로 커버할 수 있도록 일련의 morphological operations(형태학적 계산)을 적용하여 계산된다(Figure 3참조). L1 loss로 인해 result가 가능한 모든 경우의 평균이 될 수 있기 때문에 \(G_1\)의 출력은 흐릿하다[10].
However, \(G_1\) does capture the global structural information specified by the target pose, as shown in Figure 2, as well as other low-frequency information such as the color of clothes.
Details of body appearance, i.e. the high-frequency information, will be refined at the second stage through adversarial training.
\(G_1\)은 Figure 2에서 보는것처럼, 옷의 색상과 같은 다른 low-frequency information뿐만 아니라 target pose에 의해 명시된 global structural information을 capture한다.
body appearance, 즉 high-frequency information는 적대적 훈련을 통해 두 번째 단계에서 다듬어질 것이다.
3.2 Stage-II: Image refinement
Since the model at the first stage has already synthesized an image which is coarse but close to the target image in pose and basic color,
at the second stage, we would like the model to focus on generating more details by correcting what is wrong or missing in the initial result.
We use a variant of conditional DCGAN [21] as our base model and condition it on the stage-I generation result.
첫 번째 단계의 모델은 이미 coarse하지만 target image의 pose와 basic color에 가까운 이미지를 합성했다,
두 번째 단계에서는 모델이 초기 결과에서 잘못되거나 누락된 부분을 수정하여 더 많은 details을 생성하는 데 초점을 맞춘다. 우리는 conditional DCGAN[21]의 변형을 기본 모델로 사용하고 이를 단계 I 생성 결과에서 조건화한다.
Generator G2. Considering that the initial result and the target image are already structurally similar, we propose that the generator G2 at the second stage aims to generate an appearance difference map that brings the initial result closer to the target image.
Generator G2* 초기 결과와 target image가 이미 구조적으로 유사하다는 점을 고려하여, 두 번째 단계에서 generator G2는 초기 결과를 target image에 더 가깝게 만드는 appearance difference map 생성을 목표로 할 것을 제안한다.
The difference map is computed using a U-Net similar to the first stage but with the initial result \(\hat{I}_{B1}\) and condition image \(I_A\) as input instead.
The difference lies in that the fully-connected layer is removed from the U-Net. This helps to preserve more details from the input because a fully-connected layer compresses a lot of information contained in the input.
difference map은 첫 번째 단계와 유사하지만 대신 initial result \(\hat{I}_{B1}\)와 condition image \(I_A\)를 입력으로하는 U-Net을 사용하여 계산된다. 차이점은 fully-connected layer가 U-Net에서 제거된다는 데 있다. 이렇게 하면 fully-connected layer가 입력에 포함된 많은 정보를 압축하기 때문에 입력에서 더 많은 details를 보존할 수 있다.
The use of difference maps speeds up the convergence of model training since the model focuses on learning the missing appearance details instead of synthesizing the target image from scratch.
In particular, the training already starts from a reasonable result. The overall architecture of G2 can be seen in Figure 2.
모델이 처음부터 target image를 합성하는 대신 누락된 appearance details를 학습하는 데 중점을 두기 때문에 difference maps을 사용하면 모델 training의 수렴 속도가 빨라진다. 특히 training은 이미 합리적인 결과에서 출발한다. G2의 전체적인 구조는 Figure 2에서 볼 수 있다.
Discriminator D. In traditional GANs, the discriminator distinguishes between real groundtruth images and fake generated images (which is generated from random noise).
Discriminator D. 기존 GAN에서 discriminator는 groundtruth images와 fake generated images(랜덤 노이즈에서 생성됨)를 구별한다.
However, in our conditional network, G2 takes the condition image \(I_A\) instead of a random noise as input. Therefore, real images are the ones which not only are natural but also satisfy a specific requirement. Otherwise, G2 will be mislead to directly output \(I_A\) which is natural by itself instead of refining the coarse result of the first stage \(\hat{I}_{B1}\).
그러나, 우리의 conditional network에서 G2는 random noise 대신 condition image \(I_A\)를 입력으로 받는다. 따라서, real images는 자연적일 뿐만 아니라 특정 요구 사항을 충족하는 이미지이다. 그렇지 않으면, G2는 첫 번째 단계 \(\hat{I}_{B1}\)의 coarse result를 다듬는 대신 그것 스스로 자연스러운 \(I_A\)를 직접 출력하도록 잘못 이끌것이다.
To address this issue, we pair the G2 output with the condition image to make the discriminator D to recognize the pairs’ fakery, i.e., (\(\hat{I}_{B2}\), \(I_A\)) vs (\(I_B\), \(I_A\)).
This is diagrammed in Figure 2. The pairwise input encourages D to learn the distinction between \(I_{B2}\) and \(I_B\) instead of only the distinction between synthesized and natural images.
이 문제를 해결하려면, the discriminator D가 pairs’ fakery를 인지하게 만들기 위해서 G2 output와 condition image를 pair로 한다. (\(\hat{I}_{B2}\), \(I_A\)) vs (\(I_B\), \(I_A\)) 이것은 Figure 2에 다이어그램되어 있다. pairwise input은 D가 합성된 이미지와 자연적 이미지의 구별만 하지 않고 \(I_{B2}\)와 \(I_B\)의 구별을 학습하도록한다.
Another difference from traditional GANs is that noise is not necessary anymore since the generator is conditioned on an image \(I_A\), which is similar to [17]. Therefore, we have the following loss function for the discriminator D and the generator G2 respectively,
전통적 GAN과 또 다른 점은 유사한 이미지 \(I_A\)에서 generator가 조건화 되었기 때문에 더이상 noise가 필수적이지 않다는 것이다. 따라서 우리는 discriminator D와 generator G2에 대해 각각 다음과 같은 loss function을 가지고 있다.
\(L^D_{adv} = L_{bce}(D(I_A,I_B),1) + L_{bce}(D(I_A,G2(I_A, \hat{I}_{B1})),0),\qquad \qquad (2)\) \(L^G_{adv} = L_{bce}(D(I_A,G2(I_A,\hat{I}_{B1})),1), \qquad \qquad (3)\)
where \(\lambda\) is the weight of L1 loss. It controls how close the generation looks like the target image at low frequencies. When \(\lambda\) is small, the adversarial loss dominates the training and it is more likely to generate artifacts; when \(\lambda\) is big, the the generator with a basic L1 loss dominates the training, making the whole model generate blurry results2.
여기서 \(\lambda\)는 L1 loss의 weight이다. 이 기능은 저주파수에서 얼마나 generation이 target image처럼 보이는지를 제어한다. \(\lambda\)가 작으면, adversarial loss이 훈련을 지배하고 artifacts를 생성할 가능성이 더 높다. $\lambda$가 크면, basic L1 loss가 있는 generator가 훈련을 지배하여, 전체 모델이 blurry results를 생성한다.
In the training process of our DCGAN, we alternatively optimize discriminator D and generator G2. As shown in the left part of Figure 2, generator G2 takes the first stage result and the condition image as input and aims to refine the image to confuse the discriminator. The discriminator learns to classify the pair of condition image and the generated image as fake while classifying the pair including the target image as real.
DCGAN의 training process에서 우리는 discriminator D와 generator G2를 대안으로 최적화한다. Figure 2의 왼쪽 부분에 표시된 것처럼, generator G2는 1단계 결과와 condition image를 입력으로 사용하고 iscriminator를 혼동하도록 이미지를 미세화하는 것을 목표로 한다. discriminator는 target image를 포함하여 pair를 실제 이미지로 분류하는 동안 condition image와 generated image의 pair를 가짜로 분류하는 방법을 학습한다.
3.3 Network architecture
We summarize the network architecture of the proposed model PG2.
우리는 제안된 모델 PG2의 네트워크 아키텍처를 요약한다.
At stage-I, the encoder of G1 consists of $N$ residual blocks and one fully-connected layer, where $N$ depends on the size of input.
Each residual block consists of two convolution layers with stride=1 followed by one sub-sampling convolution layer with stride=2 except the last block.
1단계에서 G1의 encoder는 \(N\)개의 residual blocks과 하나의 fully-connected layer으로 구성되며, 여기서 \(N\)은 입력 크기에 따라 달라진다. 각 residual block은 stread=1인 2개의 convolution layers와 마지막 블록을 제외한 stread=2인 1개의 sub-sampling convolution layer로 구성된다.
At stage-II, the encoder of G2 has a fully convolutional architecture including N-2 convolution blocks.
Each block consists of two convolution layers with stride=1 and one sub-sampling convolution layer with stride=2.
Decoders in both G1 and G2 are symmetric to corresponding encoders. Besides, there are shortcut connections between decoders and encoders, which can be seen in Figure 2.
In G1 and G2, no batch normalization or dropout are applied.
All convolution layers consist of 3x3 filters and the number of filters are increased linearly with each block.
단계 II에서 G2의 encoder는 N-2 convolution blocks을 포함한 fully convolutional architecture를 가지고 있다. 각 블록은 stread=1인 2개의 convolution layers와 stread=2인 1개의 sub-sampling convolution layer로 구성된다. G1과 G2의 Decoders는 모두 해당 encoders와 대칭이다. 또한, Figure 2에서 볼 수 있는 decoders와 encoders 사이에 shortcut connections이 있다. G1과 G2에서는 batch normalization 또는 dropout이 적용되지 않는다. 모든 convolution layers는 3x3 필터로 구성되며 필터 수는 각 블록에 따라 선형적으로 증가한다.
We apply rectified linear unit (ReLU) to each layer except the fully connected layer and the output convolution layer.
For the discriminator, we adopt the same network architecture as DCGAN [21] except the size of the input convolution layer due to different image resolutions.
우리는 fully connected layer와 output convolution layer를 제외한 각 레이어에 rectified linear unit (ReLU)를 적용한다. discriminator의 경우 이미지 해상도가 달라 input convolution layer의 크기를 제외한 DCGAN[21]과 동일한 네트워크 아키텍처를 채택한다.
4 Experiments
We evaluate the proposed PG2 network on two person datasets (Market-1501 [37] and DeepFashion [16]), which contain person images with diverse poses.
We present quantitative and qualitative results for three main aspects of PG2: different pose embeddings; pose mask loss vs. standard L1 loss; and two-stage model vs. one-stage model. We also compare with the most related work [36].
우리는 다양한 포즈를 가진 사람 이미지를 포함하는 두 개인 데이터 세트(Market-1501[37] 및 DeepFashion[16])에서 제안된 PG2 네트워크를 평가한다.
PG2의 세 가지 주요 측면에 대한 양적 및 질적 결과를 제시한다: different pose embeddings; pose mask loss vs standard L1 loss; 그리고 two-stage model vs. one-stage model. 우리는 또한 가장 관련성이 높은[36] 작업과 비교한다.
4.1 Datasets
The DeepFashion (In-shop Clothes Retrieval Benchmark) dataset [16] consists of 52,712 in-shop clothes images, and 200,000 cross-pose/scale pairs. All images are in high-resolution of 256x256. In the train set, we have 146,680 pairs each of which is composed of two images of the same person but different poses. We randomly select 12,800 pairs from the test set for testing.
DeepFashion(In-shop Clothes Retrieval Benchmark) 데이터 세트[16]는 52,712개의 상점 내 의류 이미지와 200,000개의 크로스 포즈/스케일 쌍으로 구성된다. 모든 이미지는 256x256의 고해상도입니다. train set에는 146,680쌍이 있으며, 각각은 동일하지만 다른 포즈의 두 이미지로 구성되어 있다. 우리는 테스트를 위해 test set에서 12,800쌍을 무작위로 선택한다.
We also experiment on a more challenging re-identification dataset Market-1501 [37] containing 32,668 images of 1,501 persons captured from six disjoint surveillance cameras. Persons in this dataset vary in pose, illumination, viewpoint and background, which makes the person generation task more challenging. All images have size 128x64 and are split into train/test sets of 12,936/19,732 following [37]. In the train set, we have 439,420 pairs each of which is composed of two images of the same person but different poses. We randomly select 12,800 pairs from the test set for testing.
우리는 또한 6개의 분리된 감시 카메라에서 캡처된 1,501명의 32,668개의 이미지를 포함하는 보다 어려운 재식별 데이터 세트 Market-1501[37]에 대해 실험한다. 이 데이터 세트의 사람은 자세, 조명, 관점 및 배경이 다양하며, 이는 사람 생성 작업을 더 어렵게 만든다. 모든 이미지의 크기는 12864이고 [37]에 이어 12,936/19,732의 train/test sets로 분할된다. train set에는 439,420쌍이 있으며, 각 쌍은 동일하지만 다른 포즈의 두 이미지로 구성된다. 우리는 테스트를 위해 test set에서 12,800쌍을 무작위로 선택한다.
Implementation details On both datasets, we use the Adam [13] optimizer with \(\beta1 = 0.5\) and \(\beta2 = 0.999\).
The initial learning rate is set to \(2e^{-5}\).
On DeepFashion, we set the number of convolution blocks \(N = 6\). Models are trained with a minibatch of size 8 for 30k and 20k iterations respectively at stage-I and stage-II.
On Market-1501, we set the number of convolution blocks \(N = 5\).
Models are trained with a minibatch of size 16 for 22k and 14k iterations respectively at stage-I and stage-II.
For data augmentation, we do left-right flip for both datasets3.
Implementation details 두 데이터 세트 모두에서 \(\beta1 = 0.5\) 및 \(\beta2 = 0.999\)와 함께 Adam [13] optimizer를 사용한다. 초기 learning rate는 \(2e^{-5}\)로 설정된다.
DeepFashion에서, 우리는 convolution blocks의 수를 \(N = 6\)로 설정한다. 모델은 1단계와 2단계에서 각각 30k와 20k iterations에 대해 8 size의 미니 배치로 훈련된다.
Market-1501에서, 우리는 convolution blocks의 수를 \(N = 5\)로 설정했다. 모델은 1단계와 2단계에서 각각 22k 및 14k iterations에 대해 16 size의 미니 배치로 훈련된다.
data augmentation을 위해, datasets3 모두에 대해 left-right flip을 수행한다.
4.2 Qualitiative results
As mentioned above, we investigate three aspects of our proposed PG2 network. Different pose embeddings and losses are compared within stage-I and then we demonstrate the advantage of our two-stage model over a one-stage model.
위에서 언급한 대로, 우리는 제안된 PG2 네트워크의 세 가지 측면을 조사한다. I 단계 내에서 서로 다른 pose embeddings과 손실을 비교한 다음 우리는 1단계 모델에 비해 2단계 모델의 장점을 보여준다.
Different pose embeddings. To evaluate our proposed pose embedding method, we implement two alternative methods.
For the first, coordinate embedding (CE), we pass the keypoint coordinates through two fully connected layers and concatenate the embedded feature vector with the image embedding vector at the bottleneck fully connected layer.
For the second, called heatmap embedding (HME), we feed the 18 keypoint heatmaps to an independent encoder and extract the fully connected layer feature to concatenate with image embedding vector at the bottleneck fully connected layer.
Different pose embeddings. 제안된 pose embedding 방법을 평가하기 위해, 두 가지 대체 방법을 구현한다.
첫 번째, coordinate embedding (CE)에 대해, 우리는 두 개의 fully connected layers를 통해 keypoint coordinates를 전달하고 bottleneck fully connected layer의 image embedding vector와 embedded feature vector를 연결한다.
두 번째로, heatmap embedding (HME)이라고 불리는, 우리는 18 keypoint heatmaps을 독립 encoder에 공급하고 fully connected layer feature을 추출하여 bottleneck fully connected layer의 image embedding vector와 연결시킨다.
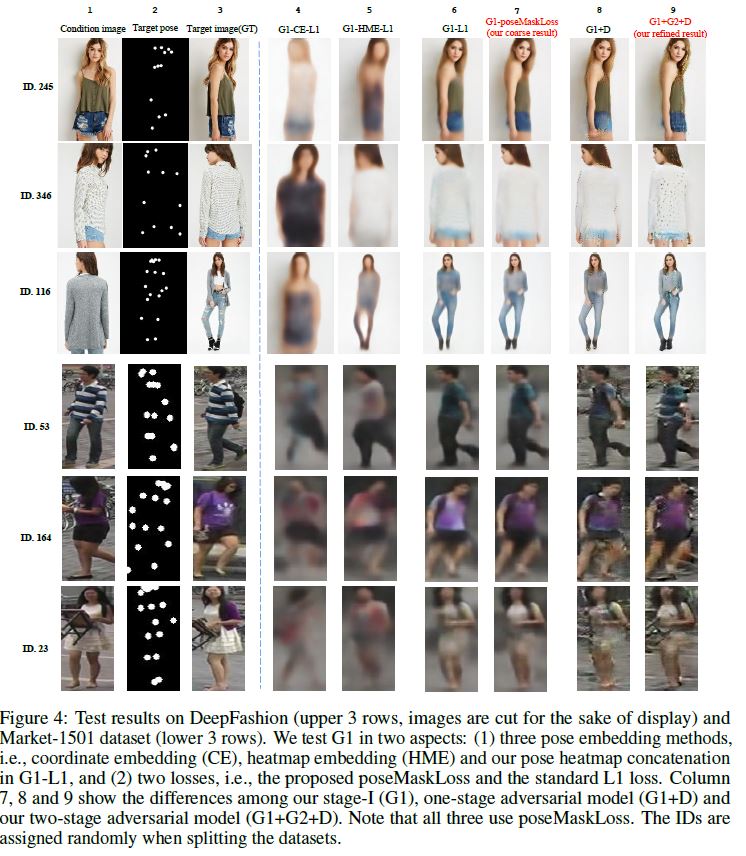
Columns 4, 5 and 6 of Figure 4 show qualitative results of the different pose embedding methods when used in stage-I, that is of G1 with CE (G1-CE-L1), with HME (G1-HME-L1) and our G1 (G1-L1).
All three use standard L1 loss. We can see that G1-L1 is able to synthesize reasonable looking images that capture the global structure of a person, such as pose and color.
Figure 4의 4, 5, 6번 열에는 1단계일때 CE(G1-CE-L1), HME(G1-HME-L1), 우리의 G1(G1-L1)를 사용하는 다양한 pose embedding methods의 qualitative results를 보여준다.
세 가지 모두 standard L1 loss을 사용한다. 우리는 G1-L1이 pose나 색과 같은 global structure of a person를 포착하는 합리적인 외모의 이미지를 합성할 수 있음을 알 수 있다.
However, the other two embedding methods G1-CE-L1 and G1-HME-L1 are quite blurry and the color is wrong.
Moreover, results of G1-CE-L1 all get wrong poses. This can be explained by the additional difficulty to map the keypoint coordinates to appropriate image locations making training more challenging.
Our proposed pose embedding using 18 channels of pose heatmaps is able to guide the generation process effectively, leading to correctly generated poses.
Interestingly, G1-L1 can even generate reasonable face details like eyes and mouth, as shown by the DeepFashion samples.
그러나 다른 두 가지 embedding methods G1-CE-L1과 G1-HME-L1은 상당히 흐릿하고 색상이 잘못되었다. 게다가, G1-CE-L1의 결과는 모두 잘못된 자세를 취한다. 이는 키포인트 좌표를 적절한 이미지 위치에 매핑하여 교육을 더 어렵게 만드는 추가적인 어려움으로 설명될 수 있다.
pose heatmaps의 18 channels을 사용하여 제안된 pose embedding은 generation process를 효과적으로 안내하여 올바르게 생성된 poses로 이어질 수 있다. 흥미롭게도, G1-L1은 DeepFashion 샘플에서 볼 수 있듯이 눈과 입과 같은 합리적인 얼굴 디테일을 생성할 수 있다.
Pose mask loss vs. L1 loss. Comparing the results of G1 trained with L1 loss (G1-L1) and G1 trained with poseMaskLoss (G1-poseMaskLoss) for the Market-1501 dataset, we find that pose mask loss indeed brings improvement to the performance (columns 6 and 7 in Figure 4).
By focusing the image generation on the human body, the synthesized image gets sharper and the color looks nicer.
We can see that for person ID 164, the person’s upper body generated by G1-L1 is more noisy in color than the one generated by G1-poseMaskLoss.
For person ID 23 and 346, the method with pose mask loss generates more clear boundaries for shoulder and head.
These comparisons validate that our pose mask loss effectively alleviates the influence of noisy backgrounds and guides the generator to focus on the pose transfer of the human body.
The two losses generate similar results for the DeepFashion samples because the background is much simpler.
Pose mask loss vs. L1 loss. Market-1501 dataset에 대해 L1 loss (G1-L1)로 훈련된 G1과 poseMaskLoss (G1-poseMaskLoss)로 훈련된 G1의 결과를 비교하면, 실제로 pose mask loss이 성능을 향상시킨다는 것을 알 수 있다(Figure 4의 6과 7열).
이미지 생성을 human body에 집중함으로써, 합성된 이미지가 더 선명해지고 색이 더 좋아 보입니다.
우리는 person ID 164의 경우, G1-L1에 의해 생성된 사람의 상체는 G1-poseMaskLoss에 의해 생성된 상체보다 색상이 더 noisy한 것을 알 수 있다.
person ID 23과 346의 경우, pose mask loss 방법은 어깨와 머리에 대한 더 명확한 경계를 생성한다.
이러한 비교는 우리의 pose mask loss이 noisy backgrounds의 영향을 효과적으로 완화시키고 generator가 human body의 포즈 전달에 초점을 맞추도록 유도한다는 것을 검증한다.
이 두 손실은 배경이 훨씬 단순하기 때문에 Deep Fashion 샘플에 대해 유사한 결과를 생성한다.
Two-stage vs. one-stage. In addition, we demonstrate the advantage of our two-stage model over a one-stage model. For this we use G1 as generator but train it in an adversarial way to directly generate a new image given a condition image and a target pose as input. This one-stage model is denoted as G1+D and our full model is denoted as G1+G2+D. From Figure 4, we can see that our full model is able to generate photo-realistic results, which contain more details than the one-stage model.
For example, for DeepFashion samples, more details in the face and the clothes are transferred to the generated images. For person ID 245, the shorts on the result of G1+D have lighter color and more blurry boundary than G1+G2+D. For person ID 346, the two-stage model is able to generate both the right color and textures for the clothes, while the one-stage model is only able to generate the right color. On Market-1501 samples, the quality of the images generated by both methods decreases because of the more challenging setting.
However, the two-stage model is still able to generate better results than the one-stage method. We can see that for person ID 53, the stripes on the T-shirt are retained by our full model while the one-stage model can only generate a blue blob as clothes. Besides, we can also clearly see the stool in the woman’s hands (person ID 23).
4.3 Quantitative results
We also give quantitative results on both datasets. Structural Similarity (SSIM) [31] and the Inception Score (IS) [26] are adopted to measure the quality of synthesis. Note that in the Market-1501 dataset, condition images and target images may have different background. Since there is no information in the input about the background in the target image, our method is not able to imagine what the new background looks like. To reduce the influence of background in our evaluation, we propose a variant of SSIM, called mask-SSIM. A pose mask is added to both the synthesis and the target image before computing SSIM. In this way we only focus on measuring the synthesis quality of a person’s appearance. Similarly, we employ mask-IS to eliminate the effect of background.
However, it should be noted that image quality does not always correspond to such image similarity metrics. For example, in Figure 4, our full model generates sharper and more photo-realistic results than G1-poseMaskLoss, but the latter one has a higher SSIM. This is also observed in super-resolution papers [12, 27].
The advantages are also clearly shown in the numerical scores in Table 1. E.g. the proposed pose embedding (G1-L1) consistently outperforms G1-CE-L1 across all measures and both datasets. G1- HME-L1 obtains similar quantitative numbers probably due to the similarity of the two embeddings. Changing the loss from L1 to the proposed poseMaskLoss (G1-poseMaskLoss) consistently improves further across all measures and for both datasets. Adding the discriminator during training either after the first stage (G1+D) or in our full model (G1+G2+D) leads to comparable numbers, even though we have observed clear differences in the qualitative results as discussed above. This is explained by the fact that blurry images often get good SSIM despite being less convincing and photo-realistic [12, 27].
4.4 User study
We perform a user study on Amazon Mechanical Turk (AMT) for both datasets. For each one, we show 55 real images and 55 generated images in a random order to 30 users. Following [10, 15], each image is shown for 1 second. The first 10 images are used for practice thus are ignored when computing scores. From the results reported in Table. 2, we can get some observations that (1) On DeepFashion our generated images of G1+D and G1+G2+D manage to confuse users on 9.3% and 14.9% trials respectively (see G2R), showing the advantage of G1+G2+D over G1+D; (2) On Market-1501, the average score of G2R is lower, because the background is much more cluttered than DeepFashion; (3) On Market-1501, G1+G2+D gets a lower score than G1+D, because G1+G2+D transfers more backgrounds from the condition image, which can be figured out in Figure. 4, but in the meantime it brings extra artifacts on backgrounds which lead users to rate ‘Fake’; (4) With respect to R2G, we notice that Market-1501 gets clearly high scores (>10%) because human users sometimes get confused when facing low-quality surveillance images.
4.5 Further analysis
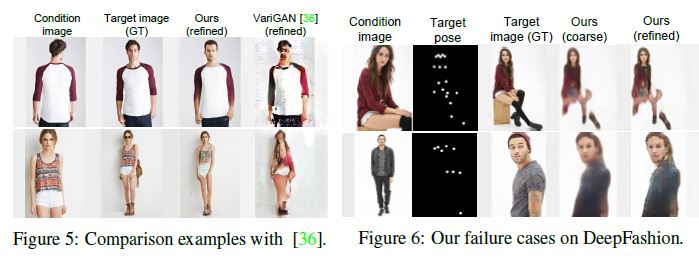
Since our task with pose condition is novel, there is no direct comparison work. We only compare with the most related one6 [36], which did multi-view person image synthesis on the DeepFashion dataset. It is noted that [36] used the condition image and an additional word vector of the target view e.g. “side” as network input. Comparison examples are shown in Figure 5. It is clear that our refined results are much better than those of [36]. Taking the second row as an example, we can generate high-quality whole body images conditioned on an upper body while the whole body synthesis by [36] only has a rough body shape.
Additionally, we give two failure DeepFashion examples by our model in Figure 6. In the top row, only the upper body is generated consistently. The “pieces of legs” is caused by the rare training data for such complicated poses. The bottom row shows inaccurate gender which is caused by the imbalance of training data for male / female. Besides, the condition person wears a long-sleeve jacket of similar color to his inner short-sleeve, making the generated cloth look like a mixture of both.
Conclusions
In this work, we propose the Pose Guided Person Generation Network (PG2) to address a novel task of synthesizing person images by conditioning it on a reference image and a target pose. A divideand-conquer strategy is employed to divide the generation process into two stages. Stage-I aims to capture the global structure of a person and generate an initial result. A pose mask loss is further proposed to alleviate the influence of the background on person image synthesis. Stage-II fills in more appearance details via adversarial training to generate sharper images. Extensive experimental results on two person datasets demonstrate that our method is able to generate images that are both photo-realistic and pose-wise correct. In the future work, we plan to generate more controllable and diverse person images conditioning on both pose and attribute.
Acknowledgments
We gratefully acknowledge the support of Toyota Motors Europe, FWO Structure from Semantics project, KU Leuven GOA project CAMETRON, and German Research Foundation (DFG CRC 1223). We would like to thank Bo Zhao for his helpful discussions.